Friday, December 19, 2014

Warhammer 40K - Happy Holidays from the Aquila Stronghold


Hi everyone,

We were pretty impressed after playing against Mr. L's Tau and the Aquila Stronghold - so have been working to assemble our own.

Thought we'd take a moment for a seasonal holiday photo!

Holiday Warhammer 40K, Christmas 40K, Christmas Warhammer, Christmas Space Marine, Aquila Strongpoint, Winter
Happy Holidays!

One thing which helped us get this model together was use of several clamps.  We like using plastic glue rather than super glue (when we can).  It's a bit more messy, and our joints aren't quite as pretty - but we have more time to make things go the way we want - and don't risk finger-gluing.  *But* when we use plastic glue on a model like this the clamps were a must to get everything to hold together nicely.

Aquila Strongpoint, Blood Angels, Battle Gaming One, Warhammer 40K
The Blood Angels testing out the Strongpoint!

Looking forward to trying our the super huge cannon in a battle.  (And, we already know how deadly those missiles can be.  In the Mr. L battle the missiles even chased across the board and caused damage to the strong hold itself.)

PS:  We're thinking about how to best use the Strongpoint....  If Mr. L was using the Stronghold to help the Tau, does that mean we could use it to help the Orks?

Sunday, December 14, 2014

Warhammer 40K -- Weeks 4 & 5 -- League Wrap-up


Hi everyone,

With some seasonal colds slowing us down, we're a bit delayed in writing up our Week 4 and Week 5 battles in our League over at Game Kastle in Fremont.  So, decided to write them up in one joint posting.

Week #4:
  • (Yay!) Borrowed Mr. Z's Stompa!  (His paint job looked extremely cool with the Pink and Yellow Orky Orks)
  • (Oh-no!) Played against Mr. L's Tau and their lethal void-missile launching base
Here is Mr. L's Stompa with our Morkanaut, Burna Bommer and Battlewagon!

The Battle:

We used the Great Waaagh! Detachment - and got Deep Strike on our Big Mek and also on one unit of Boyz.  Bummer that we didn't get it on the Stompa!!!

So, we lined up with our forces to prepare to charge in and attack Mr. L's missile building.  One additional bummer for us is that we need to charge the long way.  But, with the Stompa's move distance, we feel pretty good that we can get there.

Our initial lineup:  Trukk on near side; Morkanaut and Battlewagon up the middle; Stompa up the right....

Mr. L fires his void missiles right away.  And, that's when we learn the bummer of those missiles.  The void spots they create stay on the board unless doubles are rolled - and keep scattering around!

Moving toward the missile battery...

The first of the void missile shots chasing the Stompa after it's already hit it once!

We get finally get the Stompa pretty close to the missile battery - and have our deep strike units landing very close as well.  Looking very good for the Ork-guys at this point!

The Stompa has almost reached range to use its massive close-combat weapons!  Just one more turn will do it!

What happens?  Well one of those void spots chases down the Stompa and literally clips it on the right heel.  Of course a massive explosion results when the Stompa explodes (not good!)....  But, we press on.  The Tau may have killed the Stompa - but the Morkanaut and Battlewagon are now very close.

It's uncanny how the void thingies keep chasing after the Ork's most powerful unit.  Now they are "randomly" chasing after the Morkanaut!

Finally, we're down to a reduced set of forces.  The Morkanaut is out.  And our remaining forces have reached the Tau's base.  There is a key moment where if the game ends, the game will be a draw....

Our remaining forces reach the Tau's base....

...But, the die does not roll in our favor.  There is one more turn, and we simply do not have the forces needed to make it a victory.  Mr. L's Tau win.

Week #5:
  • (Yay!) Prepared models to run the Council of Waaagh!  We had read that this created quite a hard-core death-star like unit.
  • (Oh-No!) Played against Mr. M's Space Marines.  Very tough to get our units close enough to hurt him with his lethal long-range shots!
We have played Mr. M's Space Marines a few times now - so we should have had some idea of what to expect.  All the same, the arrival of his dropships has been a problem for us almost every time.  This time was no different....

We set up our forces to march forward toward Mr. M's Space Marines.  His drop pods landed inside our ranks....

Mr. M had brought several tank units.  He held these back and fired away.  Our goal was to close-in with the Morkanaut and the Battlewagon - to try to cause impact up-close.  We had the Council of Waaagh! in the Battlewagon - so that they could shoot from the fire-points as we advanced.

Sending the Morkanaut up the middle....

There was a little bit of excitement on the left flank as our Warbikers challenged Mr. M's bikes.

Bikes vs. bikes on the left flank

This skirmish didn't go very well for us, though.  And, the assemblage of AP1 weapons the Space Marines brought to the table quickly wiped out the Morkanaut and the Battlewagon.

The showdown between the dropped-in Dreadnought and the squad of three Killi-Kans didn't go very well for us.  Six wounds plowed through them in short order.

One Dreadnought vs. Three Killi-Kans.  (Didn't go very well for us....)

So, this left few options.  We tried to immobilize the Land Raider with a sacrificial run using the Trukk.  (It seemed worth a try - but didn't really work out)....

The Pink Orks Trukk takes on the Land Raider!

And, so, the Council of Waaagh! was basically left on its own - and gradually whittled down....  Darned good thing they had Fearless with that Waaagh! banner - they did hold on for a while.  But, eventually they lost their Feel No Pain and quickly succumbed.

The Council of Waaagh! sucked up lots of damage - but is finally wiped out....

Not sure if the Orks have any connections with Imperial or Rebel forces -- calling in forces from Long, Long Ago and Far, Far Away seemed like the only way this battle could have turned around :)

The Orks' only option - call for help!

Big lessons in Weeks 4 and 5!
  • There must be truth to "More Boyz, Less Toyz".  A single shot from an AP1 weapon wipes out some 250+ points of Morkanaut.  The same shot could not have done the same to 250+ points of Ork Boyz....
  • Spent quite a bit of time chatting with Mr. M about the ability of a certain number of units or points to suck up incoming fire.
  • Seems like quite an opportunity to analyze the statistical probability of a unit actually successfully taking that incoming shot (and living through it and perhaps taking another one) on a per-point-basis!
  • Council of Waaagh! was fun to put on the table -- but didn't yield great results.
  • The Great Waaagh! Detachment is a bit random -- but created some fun opportunities for us with the Tellyporta Strike.
Thanks once again to Mr. L, Mr. M, and Mr Z for the fun battles.  We have certainly learned a great deal from where we started in Week #1!!

Thursday, December 11, 2014

Warhammer 40K - Magnetizing Models (We tried it out!)


Hi everyone,

We gave a first attempt at magnetizing models this past weekend.  Here's a quick write-up on how things went.

First - a bit of background.  We were building a Venerable Dreadnought - and ended up with a weapon-arm on the model which we hadn't really wanted.  And, in this particular case, some glue had gotten onto the 'arm post' and it was stuck fast.

[Apologies - we realized that in our haste to fix the Dreadnought we forgot to take a very good "before" photo!]

After lots and lots of wrenching, it was pretty clear that the model glue we like to use (not super glue) had fused things together pretty solidly.  There was really no getting that arm off!!!

So, we got a little bag of those tiny magnets from our friends at Gator Games.  And, figured we would do some surgery to try to set the arm things right.

1) Tried to use our Xacto-Saw to cut away the perimeter bonded plastic at the arm joint.  This didn't work - but did loosen things up.

2) Finally sawed enough that we were able to pry the arm off.  But, BUMMER - we discovered that the post to hold on the other arms had also been pried off - and was still deep within the arm we had just yanked off.

So, we started reconstructive surgery....

3) We made a flat plate of plastic (a round piece) to cover the hole we had created in the torso of the Dreadnought.

Not super pretty - but certainly functional.  Our flat pieces of plastic covered up the holes which were created when we wrenched off the arm which was glued on.

4) And, we sawed flat the arm portion so that we could attach the magnet.

5) Then, we glued one of the little magnets to each side.

All-in-all it turned out pretty well.  Does a great job of holding together.

Here is our Dreadnought after priming.  The magnets certainly show - but don't look too much different than the plastic pin holding on the other arm...  So, we're pretty happy.

Part 2 of this adventure is that we decided to add some magnets to the doors of our Morkanaut (we were bothered by them swinging open).

That went pretty well - a few key points....

1) There is a small gap in the doors which fit our magnets perfectly (no big need to cut or drill)

2) While we were gluing one one magnet and testing with its mate, the pair went flying to the back of the model and stuck there (with superglue).  No matter how hard we tried - they are stuck.  So, I guess at some point if we want to magnet something in there, we can.


Here's the finished product - working on the painting.  The Morkanaut is part of the Pink Orks army - so working on the bright pink :)

Here is our Morkanaut - the bring pink is coming along nicely.  Going to start working on the details of the arms next....

Follow-ups....

The Morkanaut and Dreadnought so far....

We read a few posts and blogs of other people using magnets.  Seems that there are some very slick schemes for drilling a hole for these little magnets. Was wondering if there is a special drill bit people are using which doesn't have a tapered end ??

Sunday, December 7, 2014

D&D 5th Edition - a first try


Hi everyone,

Today we decided to try out D&D 5th Edition.  (Well, first we did some reading to see whether people like Pathfinder better than 5th Edition - and then we decided to give it a try.)  We ended up having quite a bit of fun!

What made the game especially fun is that now we have a handful of beginner level miniature gaming skills.  So, playing with miniatures and scenery is much quicker and more efficient.

Our session:
- We played (the two of us); plus our friend Mr. N.  Artist Expert is planning to play in the next session - but wasn't able to today.

Campaign Summary:

Scene 1:

Two young adult friends Ukabuk (LVL 1 Human Fighter) and Duscutt (LVL 1 Human Wizard) are exploring in the barn-loft at the home of local pub owner Boeuf (LVL 1 Human Cleric).  They find a chest full of old war-gear.

Ukabuk finds a heavy crossbow, a longbow, 1 very shiny arrow (enchanged?), a quiver full of arrows, a warhammer [very fitting for Warhammer 40K fans!], and a battleaxe.  He also finds a set of chainmail armor.

Duscutt finds a heavy crossbow, a hand crossbow, a longbow, and a quiver full of arrows (one of them very shiny).  He also finds some chainmail armor.

While Ukabuk and Duscutt are playing with their new equipment, they hear sounds of a scuffle down below.  Peering down, they see some very, very, very, very, very, totally ugly weird creatures mixed up in a fight with Boeuf!  They immediately rush to help Boeuf out.

The attackers are Goblins and Boeuf holds them off in turn 1 -- with one of the Goblins hurting itself with a 1 roll :(  Then, Ukabuk and Duscutt weigh in.  Ukabuk (pretty high dexterity) fires with the heavy crossbow.  Duscutt fires a magic missile (his first!).

The battle winds down as all 5 Goblins are dispatched.  Luckily for all involved, Boeuf turns out to have some healing skills (big magic Cleric bandages!)

Boeuf comments, "it was sure lucky that you two were here.  And, where did you get those weapons?"  Ukabuk and Duscutt explain to Boeuf that they had found the equipment in his own loft.  "Well, you're welcome to them.  Must have been left there by me grandfather long ago."  Ukabuk -- who has been training as a blacksmith -- asks, "any idea where I can get some iron or steel around here?  I'm working on a set of plate mail armor."  Boeuf suggests that they visit his friend at the next farm toward town.

That afternoon, Duscutt, studying his magic books, figures out a new spell -- Burning Hands.  And, Ukabuk fashions a shield with the bits and pieces of metal which are scattered about.  After a good night's sleep, they are off. 

Scene 2

As they reach the next farm yet again they see the signs of a struggle.  Boeuf rushes to the door of the farmhouse.  The farm owner, Lana, is collapsed in her front door.  Boeuf immediately offers aid.  Meanwhile, Duscutt peeks inside the house.  "Hey!  There are two more of those Goblins in here!"
Duscutt and Ukabuk make short order of the two Goblins while Boeuf tends to Lana.  They see another band of Goblins retreating to the north - but decide that pursuit is a bad idea at this very moment.

They rest and discuss the Goblin attacks.  After much discussion they form a plan.  Duscutt has learned the spell Disguise Self - and will cast this upon Lana.  She can then sneak to the north to see where the Goblins are holing up.

Executing the plan, Lana returns with word that she saw the Goblins entering a broken down building just a bit up the road.

Scene 3:

The adventurers rest up and head north.  They use a similar plan, with Lana disguised as a Goblin entering the run-down building.  There she sees two Goblins standing on either side of a stairway heading down beneath.  These Goblins challenge her.  One problem -- Lana doesn't speak Goblin.  Luckily Duscutt does - and he whispers the proper response to Lana (and the Goblins don't notice).

Lana attempts a backstab attack on the two guards - a total fail.  But, Ukabuk hits with a heavy crossbow bolt.  And, Duscutt and Boeuf take out the other one.

Propping up the dead guards (so that their passage might not be noticed), the party carefully descends....

At the bottom of the stairway, a hallway opens into a large room.  To the left, three Goblins are tending to something in a large pit beneath.  To the right, six Goblins are having some sort of discussion.  A boarded up opening is noted to the far right.

The four quickly create a plan.  Ukabuk goes left and takes on the three Goblins by the pit.  Duscutt goes right and uses Burning Hands to dispatch four of the Goblins.  Boeuf and Lana take on the remaining two.

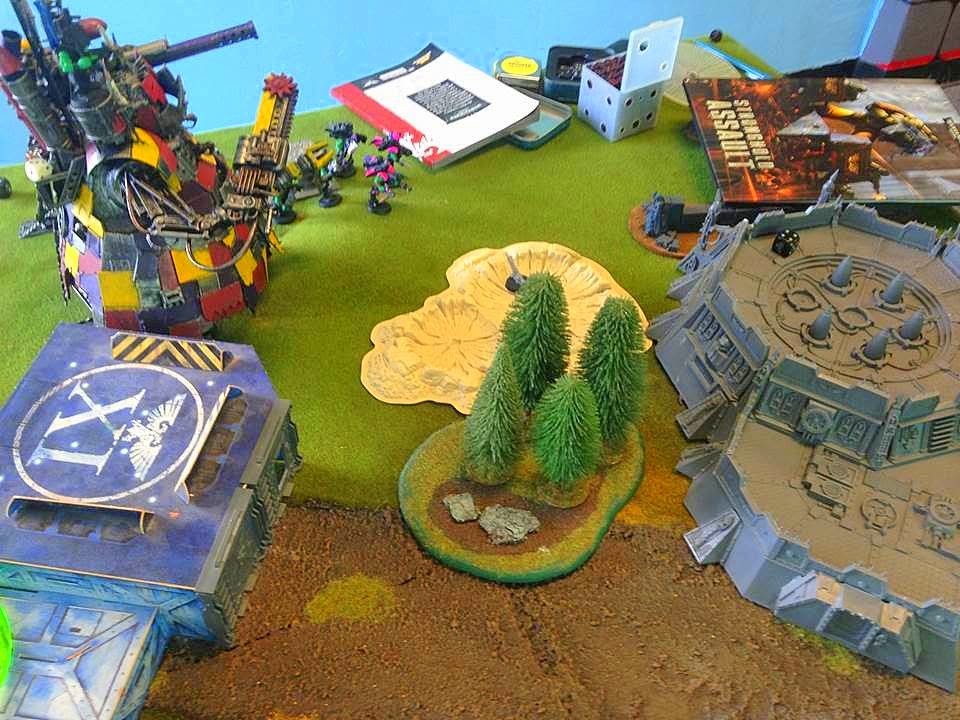
Here is the scene of the attack.  We used miniatures from our Lord of the Rings set for Goblins.  We had just gotten miniatures to use our characters at Gator Games (but hadn't gotten to paint them yet.)

This works out fairly well, but 3 on 1 is tough odds for Ukabuk - who retreats when he is down to only 1 hit point "Ouch!".  Lana charges in to hold the line - and to give Boeuf a chance to heal Ukabuk.

With these Goblins out of the way, the group debate their next move.  Down pit?  Through the boarded up opening?  Or, even, call it day?  They decide to call it day - but sleep in the Goblin's Liar.  Eight hours of careful watch pass - and are uneventful....  (Duscutt takes the whole watch so that the other party members can heal.)

After the rest, Ukabuk chops away at the boarded up doorway - and opens up a hallway type passage.

Lana discovers the spider in the pile of debris!

The four explore - a small room - with some debris in the corner.  Lana quickly inspects - and jumps back from a Spider who was lurking inside.  Ukabuk quickly kills the spider - and the inspection of the corner continues.  An old sword and chest (locked) are discovered.

Wrap up:

- We worked out experience - and each character gained 300 EXP.  As we read the 5E rules, enough for 2nd level :)

- All-in-all, it was lots of fun - we are looking forward to our next session against the Goblins!

- The adventure tiles we had gotten to play Star Wars Edge of the Empire worked really well for D&D 5E as well.  Hadn't ever played with these before - but they made things super quick to set-up.

- We lit candles to play - added to the overall theme of playing D&D!

Here's a quick photo of our overall dungeon set-up.  The great thing about posting this is that we can quickly refer to the photos to set up our next campaign....

Wednesday, November 26, 2014

Battle Gaming One Seattle Visit -- Meeples Games


Hi everyone,

We are in Seattle for the 2014 Thanksgiving Holiday - and after looking for a fun game store to visit, we stumbled upon Meeples - a game store where you can eat food and play games!


Here is the store link:  http://meeplesgames.com/

One cool thing is that Meeples Games is up on the 2nd floor - so the store is quite large.  Lots of space for selling games, playing games and playing while eating.  (For us 40K fans, there is a whole back room with tables ready for terrain!)

Meeples Games has the whole 2nd floor of this building.  Ton of space!

We took the plunge and bought the D&D Attack Wing.  We'll have to wait for a battle of X-wings or TIE fighters against dragons until we get home - but while in Seattle we can practice with the dragons.

Meeples turned out to be great.  We love our game stores at home - but it was really cool to find a game store where we could order up lunch while we played a game of X-wing (using one of the store's many in-store boxes).

Here we are getting ready to play X-wing - the counter and kitchen are in the background!

We played a quick game with Luke's X-wing against a Black Squadron Pilot and an Academy Pilot.  The deck was stacked pretty heavily in Luke's favor - but we were OK with that, since we were mainly trying to explain the basics of the game to our honored family member(s) who had joined :)

Sure enough it was fun to play while eating lunch.  Everybody was happy - veggie things for the older ones of us; sandwiches (even gluten free options) for the younger ones of us.


Luke made short order of the two underpowered TIE fighters.  (To be expected, but was still fun.)

"Help - this is Imperial Cadet YK-431.  Need back-up!!  X-wing has me in its sights!  Aaaagh!!!"

After playing X-wing over lunch we chatted with the store owner about several other games which sound interesting....

- King of Tokyo.  The Meeples team suggested that this would be a really fun and quick game to play over lunch.  We went with X-wing - but very glad to know about a game which is quick and fun.  Sounds like in this one you get to play monsters attacking buildings ??

Meeples Games store copy of King of Tokyo

- Golem Arcana.  We got to see what was inside the demo box.  Very cool figures, maps and cards.  Sounds like you play with a "reader pen" which you use to determine how the game goes -- and you use an iPhone or iPad App to keep the game flowing.  (Almost as if the iPad takes the place of a Game Master, maybe?)

The starter box for Golem Arcana

- Marvel Dice Masters.  We chatted about this as well.  It looks very fun - lots of fun colored dice.  From Meeples' website can see that they have tournaments of this quite often....

Update:

Our top-secret Seattle informant just sent us this photo from the Seattle Times about Meeples Games (we're not the only ones who liked it)....


Monday, November 24, 2014

Warhammer 40K -- Old School Warhammer Models (Blood Angels)


Hi everyone,

Yesterday we got a bunch of cool "old school" Warhammer 40K things from Mrs. D off craigslist.  (Mrs. D sold them for a friend whose son was no longer into Warhammer 40K.)  Was a bit of a long drive to get them - but lots of fun (the drive and playing with the new things).

Here was the craigslist post image from Mrs. D

Getting the Blood Angels - and the single squad of Ork Boyz out of their boxes kept the trip home lively.  When we stopped (for lunch) we set up some quick battle scenarios on the back deck of the car...

Battle set up on the back deck of the car

A few things we noticed as we pawed through our new army additions....

1) "In the old days" the paint names were great (very good for beginning people like us).  No questions about which model gets painted "Ultramarines Blue".

Paints with straightforward names like Skull White, Blood Red, Dark Angels Green, etc... 

Blood red spray paint!

2) The boxes were pretty cool.  They had inner boxes - with outer shells.  Unlike today, can imagine keeping your finished models inside (in case they needed to sit in the closet or garage for a bit.)Also noticed that the names of things have changed a bit over time.  "Space Orks" has been shortened to "Orks".

Here's an old Blood Angels Box - with inner lining box

And, a Space Ork Boyz "Battle Squad" box.  (We did get some barrels - maybe they came with the Space Ork Boyz....)

And, the box set - maybe this is where the metal models came from?

3) Mrs. D's friend's son has posters.  Here's a picture of a great one with Predator tanks and their internal construction.  This one is going up on the wall!

Predator tank poster

4) The metal figures feel REALLY substantial.  It was a fun puzzle figuring out which arms and backpacks had gone with which models.  And, we had to donate a few extras from our pile of bits.  But, we got everyone back into working shape!

The tactical squad models are metal - a little bit of battlefield first aid required to get the unit back into fighting shape....

5) Blood Angels are super colorful.  Wonder if this bright red fades on people - and if we're lucky that these were sitting in a garage somewhere.  Regardless, they are bright red right now.

Super bright Blood Angels, Tank and Land Speeder

6) It's cool to have gotten a box set with some scenery in it - this will likely get us motivated.

Here's the inside of the box-set.  We haven't resurrected the trees yet - that'll be our next challenge.

7) The Space Marines at our house now grossly outnumber the Orks (especially the Pink Orks).  Going to make things tough for the Orks!!

The single squad of Ork Boyz is ready to take on the Blood Angels and their battle brother Ultramarines!

Close up view of the battle....

One more view of the battle.... 
 
We're now pretty inspired after seeing these Blood Angels to work on decals for the Ultramarines we've already gotten.  Watched a few videos on Youtube - and saw that there is stuff to put under the decal.  Wondering if this is what helps prevent the puckering of the decal?

Friday, November 21, 2014

D&D Attack Wing -- Watched demo play -- looked fun


Hi everyone,

While at Game Kastle in Fremont this Wednesday we watched a couple of people there playing D&D Attack Wing (their first game).

http://wizkidsgames.com/dnd/

A few things were pretty striking....

#1 - it's a LOT like X-wing (which makes sense since it uses the same system - just as the Star Trek game does)

#2 - the dragon models are really cool looking

#3 - the points look pretty similar to X-wing points

This all has us thinking - wouldn't it be fun to figure out some way to play with Star Wars fighters and D&D dragons at the same time.

Might be a bit crazy - but also might be fun to try.  (We were thinking that this might be even more cool if we played it with a Warhammer 40K terrain or table-top.)

Pretty sure we'll discuss this more and then maybe try it out :)

Sunday, November 16, 2014

Warhammer 40K -- League Play Week 3 [How to remember things!!!]


Hi everyone,

We've just wrapped up week #3 of our league play.  Week #3 of the progressive scheme - 1500 points - actually took us 2 weeks of playing.

Battle #1 was against Mr. M's Space Marines -- super close, but we lost.

Battle #2 was against Mr. Z's Eldar -- not as close, and we lost.

In particular, Battle #2 left us wondering:  What we can do to make sure we remember things!!!
- We had Grot Riggers in our vehicles -- forgot to use them each and every time
- Completely forgot to have our Ork Boyz assault once
- Completely forgot to have our Morkanaut move and shoot once
Arrrrgh!  I'm sure this happens to all Ork Bosses - and wonder how much they feel frustration when it does....

Ideas for Remembering:

- Mr. Z had a very cool suggestion to put a VERY BRIGHTLY COLORED Grot onto each vehicle which has Grot riggers.  This would be easy to implement, and just might do the trick

- Also wonder about making a checklist....  We could put down the timing for each thing we tend for forget.  (Grot riggers aren't the only thing we forget.  Forget to think about calling a Waaagh! as well.)

- Thinking about it -- the old Checklist idea is one which worked pretty well for us in Battletech.  We created a visual way to keep track of turns by marking different colors (one per turn) on the 'Mech sheets.  [Here's a link to that Blog posting.]  Seems that many people have good luck using dice for this sort of thing.  But, maybe for us, it's the old Clipboard and Checklist ??

Warhammer 40K Turn Checklist, Ork Turn Checklist, Managing 40K Turns, Battle Gaming One
Here's an example checklist with many of the things we tend for forget....
 
 
Battle #1 - Space Marine Civil War!  [Against Mr. M's Space Marines]
 
In this battle we used a 1500 point Space Marine list.  Three tank vehicles, bikes, 2 squads of scouts, veterans, librarian and captain HQs.
 
We knew we were in trouble when the Land Raider blew up turn #1.  But, we were able to fight back. 
 
Space Marine Battle, Battle Gaming One, Space Marines vs. Space Marines
Here's our initial line-up -- with Mr. M's drop-pod landing near our lines!  (And, bummer - there's a Dreadnought inside.)
 
The scouts perched on top of a building did a great job.  Especially the ones with sniper rifles.  Also very cool was the Thunderfire Cannon we snuck into the basement.  Probably one of these gets the MVP for our side.
 
Thunderfire Cannon, Warhammer 40K, Space Marine Snipers, Battle Gaming One
Here are our Scouts on the roof; Thunderfire Cannon in the basement
 
Our Dreadnaught did a good job in close combat.
 
Space Marine Dreadnought close combat, Battle Gaming One
 
Here is our Dreadnought in close combat with Mr. M's Warlord.
 
And, in the end, the battle hinged on the fact that Mr. M had 1 stealthy Marine on our side of the 12 inch line for a Line Breaker point!
 
Battle #2 - Fighting the Mr. Z's Eldar Titan
 
Aside from the grumbling earlier about (one of us) failing to remember stuff - we did successfully try several new things in this battle:
 
- We used the Great Waaagh! Detachment and had the Tellyporta "Deep" Strike for several of our units.  Amazingly the Morkanaut and the Battlewagon had the rolls of "6" needed!!!
 
- We went heavy on Nobs instead of Boyz in this battle.  Not sure we would do that again.  Ghazghkull Thraka with Boyz is pretty sweet.
 
Battle Gaming One, Killi-Kans, Yellow Orks
Here are our Killli-Kans making their way past the cool scenery!
 
Regretfully we didn't make it into close-combat with very many units in this battle.  Mr. Z was very clever moving his forces around to prevent that.
 
A photo of what was probably our best moment is below.  GT and his crew took out Mr. Z's tank - and then moved on to take out one squad of his troops along with his Warlord.
 
Ghazghkull Thraka in close combat, Orks fighting Eldar, Warhammer 40K, Battle Gaming One
Our best moment - Ghazghkull Thraka in close combat!
 
We did get Linebreaker points thanks to the Trukk whose Boyz lived through the battle.  (Though if GT could have gotten to them he probably would have shot them himself for forgetting to charge the Titan when they had the chance!!)
 
Pink Orks, Pink Orkys, Pink Trukk, Warhammer 40K, Battle Gaming One
Here is the Pink Orky's Trukk - charging up the right side of the battlefield...
 
In the end, things came down to the Morkanaut fighting Mr. Z's Titan.  Maybe things could have gone differently with different dice rolls.  The "Mork" still had plenty of fight in it when the game ended at the end of Turn 5.
 
 
Morkanaut fighting Eldar, Warhammer 40K, Battle Gaming One
The big battle at the end!  The Morkanaut was immobilized - very cool of Mr. Z to jump his Titan over and fight "hand-to-hand"!!
 
Thanks to Mr. M and Mr. Z for the very fun battles!